


How to Record over USB with the AMPED 2
Recording at home, and getting great results, has never been easier.
You can connect any of the AMPED range to your computer via USB and record direct to your DAW over USB. This is a great way to capture high quality guitar sounds with minimal setup time. In this lesson we’re going to learn just how to do that.
Connecting the Unit
Using a USB-C cable, you can connected your AMPED product to an empty USB port on your computer.
In doing so, a driver setup wizard will automatically run, downloading the relevant drivers needed to connect AMPED to your DAW.

Choosing AMPED as Your In/Out Device
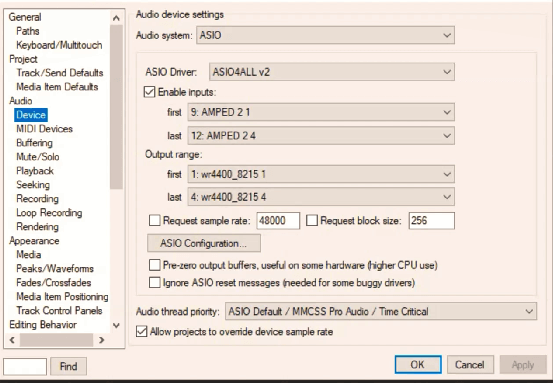
Once you have plugged the unit in and the computer installs the AMPED drivers, you will need to head over to the audio device settings inside your DAW.
The AMPED units run off drivers that require you to download a free add on called ASIO4ALL. Once you download this it will appear in your ASIO Driver list, select it as below.
Open the ASIO Configuration and ensure that inputs and outputs are selected for the AMPED:

Set your inputs and outputs as per the video to use the AMPED as your in and out device. If using the AMPED as an output device you will need headphones or speakers connected to it. If you are using a second interface as your output device, you will need to select the channels for that.
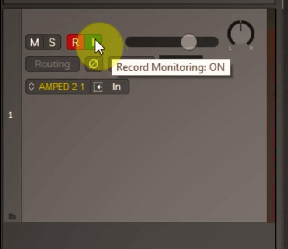
Create a Track
Create a new track in your DAW, record enable it and if you’re using the output of the AMPED, enable record monitoring so you can hear a playback of what you play.
Reduce Latency
When recording, you may experience some latency. If you have any latency, go back into the ASIO Configuration screen and adjust the ASIO Buffer Size slider. The lower to set it the lower the latency and the higher you set it the longer the latency but the less glitches in audio.
Experiment with this slider to find a point where it feels good to play but does not cause any glitching in the audio.
As a general rule, lower spec computers will struggle to achieve lower latency without glitching.

Hit Record and Play
Now that you’ve done that you can just hit record and play!
The AMPED will record over USB so any changes you make to the unit, such as switching effects on or off, will automatically be embedded into the audio track by default.
————————————————————————-
About the Author
This article on how to record over USB with AMPED was written by Leigh Fuge. Leigh is a professional guitarist and content creator and also works alongside musicteacher.com to create guitar focused, educational and entertainment content.
If you’re looking for a guitar teacher in your local area, check out their music teacher database to find your local teacher today. Each teacher has their own local page such as Guitar Lessons Hammersmith. Find your local teacher today!